Read before your first flight

Manual

What Jet 9000 is and how realistic it is, how a plane flies, and how to fly the G650ER from the gate to the runway and back. About fifteen minutes.

Part 1

About Jet 9000

01What Jet 9000 is

Jet 9000 is a flight simulator that runs in your browser. You fly one aircraft, the Gulfstream G650ER business jet, anywhere over Europe. The ground is real terrain with satellite photos, the buildings come from OpenStreetMap, and there are 902 airports with their real runways, taxiways and approach lights.

You fly the whole trip, the way a real crew does:

  1. Start the jet from completely off (“cold and dark”) at a gate or in a hangar.
  2. Get pushed back, taxi to the runway and take off.
  3. Climb and cruise on the autopilot.
  4. Descend, line up with the runway and land by hand.
  5. Taxi to a parking stand and shut down.

The weather can be a preset or the real current weather at the airports. Failures are optional. Eleven missions in five levels start with a guided First flight.

The rule behind every design choice: it should feel like flying a real jet, just simpler. The jet obeys the same speeds, limits and procedures as the real one. The game helps by explaining, never by bending those rules. The Flight Assistant tells you what to do next and why, but it never flies for you.
02How realistic it is

What’s close to the real thing

  • The numbers: the G650ER’s published weights, fuel, wing size, engine thrust and speed limits.
  • How it flies: lift and drag come from how the wing meets the air, so the jet can stall, floats a moment just above the runway before touchdown, slows down when you put the gear out, and hits a wall of drag near the speed of sound.
  • Air and engines: the air gets thinner as you climb, so engines push less and burn less, and the jet moves faster for the same reading on the speed tape. Engines take seconds to speed up, and you start them the real way: battery, then the small auxiliary engine in the tail (APU), then each main engine.
  • Weather: wind, gusts, turbulence, crosswinds that swing the nose on the runway, wet runways that brake worse, and real airport weather reports (METAR).
  • Temperature: hot air is thinner, so on a hot day the engines push less and you need a longer runway. The planner works out your takeoff run.
  • The flight computer: as in the real G650, your control inputs go through a computer that stops you from stalling, banking too far or flying too fast. You can switch that protection off in the settings.
  • Procedures: the ground crew and the parking brake at pushback, a warning if you try to take off with the jet set up wrong, alerts in the real color code. And no autoland: you switch off the autopilot 200 ft above the ground and land yourself.

What’s simplified

  • Handling: Gulfstream doesn’t publish its flight data, so the model is built from published figures and textbook aerodynamics. It behaves believably, not to certified accuracy.
  • Systems: electrics, hydraulics, fuel and pressurization are cut down to the switches and failures a pilot acts on.
  • Weather in the air: the day’s temperature is applied the same way at every altitude.
  • Navigation and radio: a simple route and a landing guidance beam at your destination, instead of a full flight computer; tower messages instead of real radio calls.
  • Controls and crew: a keyboard instead of a yoke, pedals and thrust levers, and you alone instead of two pilots.

03Is it a good introduction to flying?

Yes, as an introduction. What carries over to real flying is the thinking:

  • the order of a flight and what each part is for
  • what each speed means, and why there are limits
  • how the nose and the engines work together
  • why you slow down and get ready early before landing
  • what a correct approach to a runway looks like out of the window
  • how to read a flight display at a glance
  • the words pilots use

Student pilots rehearse exactly these things at home, so their expensive hours in a real aircraft go further.

What doesn’t carry over is the feel: real controls in your hands, the forces on your body in a turn, a gusty landing, working with a second pilot and air traffic control. Jet 9000 is a game, not certified training, and it doesn’t count toward any license. If it makes you want to fly, book a trial lesson at a flying school: you’ll walk in already knowing what the instruments mean.

Part 2

How a plane flies

04The four forces

Four pushes and pulls act on the jet all the time. Flying is managing them.

  • Weight pulls it down.
  • Lift, made by the wings, holds it up.
  • Thrust, from the engines, pushes it forward.
  • Drag, the air’s resistance, holds it back.

When lift equals weight and thrust equals drag, the jet flies straight at a steady speed. More thrust than drag and it speeds up (or climbs, if you raise the nose). Less, and it slows down (or has to descend to keep its speed).

The G650ER weighs up to 47 tonnes at takeoff, and nearly half of that can be fuel. It gets lighter all flight long, and a lighter jet can fly slower. That’s why your takeoff and landing speeds change with your load.

When you fly: engines up, the jet gains speed or climbs; engines back, it slows or sinks. Everything else in this part builds on that.

05Lift, angle of attack and the stall

There are only two directions to know: where the jet is moving, and where its nose is pointing. The gap between them is what keeps you in the air.

  • Flight path: the direction the jet is moving.
  • Pitch: the direction the nose is pointing.
  • Angle of attack: how much the nose points above where the jet is moving. It isn’t a third direction, just the gap between the other two.

The air hits the wing from the direction the jet is moving. So the gap is the angle at which the wing meets the air, and that tilt against the air is what makes lift. The wing only cares about the gap, never about the horizon. That’s why the nose and the direction of travel rarely match. Pick a moment of the flight:

On your flight display, the orange wings in the middle show where the nose points, and the green circle, the flight path marker, shows where you’re going. The space between them is your angle of attack. When you want to know where the jet will end up, look at the green circle, not the nose.

Speed and angle work together. Twice the speed makes four times the lift. So when you’re fast the wing needs only a small angle, and when you’re slow it needs a big one.

The stall. The gap has a limit, about 14½° on this wing. Past it, the air can’t follow the curved top of the wing any more: it breaks away, lift drops and drag shoots up. That’s a stall. It’s about the angle, not the speed. Slow flight needs a big angle, so you get close to the limit, but pulling the nose up hard at any speed can get you there too. Try it: raise the angle of attack past 14½° and watch the lift.

Flaps are panels that slide out of the back of the wing, making it bigger and more curved. The wing then lifts more at the same angle, so you can fly slower for takeoff and landing, at the price of extra drag.

When you fly: watch the green circle: that’s where you’re going, whatever the nose is doing. When you’re slow, never pull the nose up hard. If the jet stalls: nose down W, full thrust, wings level.

06Nose for direction, thrust for speed

Speed and height are like two savings accounts. The nose moves money between them; only the engines add more.

Raise the nose and you climb, but you lose speed. Lower it and you gain speed, but you lose height. To have more of both, you need thrust.

So pilots fly by one rule: the nose sets where you’re going, the thrust sets your speed. Two examples on approach:

  • You’re on the right path but 5 kt slow: add a little thrust. Don’t raise the nose, which would only slow you more.
  • You’re at the right speed but above the path: lower the nose a little to get back on it, and ease the thrust so you don’t speed up.

Holding a speed by hand. Engines take a few seconds to react, so you have to think ahead:

  1. Make a small change: a tap or two of ↑ or ↓ (2% each).
  2. Look at the thrust levers (the small box next to the flight display, or bottom left in the cockpit view): the white handle is where you’ve set them and stays there; the green fill is the power the engines give, and it climbs or drops to meet the handle in a few seconds. That delay is real: a jet engine takes time to spool up.
  3. Look at the green line on the speed tape: that’s where your speed will be in 10 seconds.
  4. Wait for it to settle before changing anything else.

The usual mistake is chasing the number: lots of thrust because the speed is low, then all of it off when it overshoots. Or let the autothrottle X hold the speed, as crews do most of the time.

Coming down. A jet is so streamlined that it can’t descend and slow down at the same time. Start down early: about 3 NM of distance for every 1,000 ft you need to lose. From 30,000 ft, that’s about 90 NM out, plus a bit to slow down. Too high and fast anyway? The speedbrake B adds drag.

When you fly: wrong speed, use the thrust. Wrong path, use the nose. Small changes, then wait.

07Why a slow jet keeps getting slower

Fly fast and drag holds you back. Fly very slow and drag holds you back too. In between is the speed with the least drag, and below it the jet keeps slowing down on its own unless you add thrust.

Drag comes from two places:

  • Pushing through the air (pilots call it parasite drag). The faster you go, the more of it, and it grows quickly: twice the speed, four times this drag. The gear, flaps and speedbrake add a lot of it, which is why they slow you down.
  • Holding you up (induced drag). Making lift costs energy too. The slower you fly, the more the wing has to be tilted, and the bigger this cost gets.

Add them up and there’s one speed where drag is smallest. Above it, speed is stable: slow down a little and drag drops, so you settle. Below it, the opposite happens: slow down a little and drag grows, which slows you more, which makes even more drag. The speed doesn’t settle; it keeps falling until you add thrust. Pilots call this the “back side of the drag curve”.

Your approach speeds, with gear and flaps out, are close to or below that point. That’s why a jet that gets slow on final keeps getting slower.

When you fly: on approach, the moment the speed drops below your target, add thrust. A little early beats a lot late. Never fix a low speed by raising the nose.

08Turning

A plane turns by tilting its wings. Tilted lift pulls the jet sideways around the turn.

When the wings tilt (bank), part of the lift points sideways and turns you, so less of it holds you up. To stay at the same height, the wing must make more lift in total: raise the nose slightly and add a little thrust.

The steeper the bank, the more lift you need. At 30° it’s about 15% more; at 60° it’s twice the jet’s weight, which you’d feel as 2 g, twice your normal weight in the seat. The stall speed goes up with it, by about 40% at 60°. Airliners and business jets normally turn at 15–25°. In Jet 9000 the flight computer holds up to 33° if you let go, and rolls back from steeper angles.

When you fly: keep turns at 25° or less, add a touch of back pressure S in the turn, and never combine a steep turn with low speed.

09Speed up high, and on hot days

The higher you go, the thinner the air, so the number on your speed tape and your real speed drift apart.

  • Indicated airspeed, the number on your speed tape, is how strongly the air hits the jet. That’s what the wing feels.
  • True airspeed is how fast you’re really moving through the air.
  • Groundspeed is how fast you’re moving over the ground: true airspeed plus or minus the wind. It’s at the top left of the map display.

At sea level, indicated and true airspeed are the same. At 41,000 ft the air is about a quarter as thick, so the tape shows about 260 kt while you’re really doing nearly 490.

Lift and the stall depend on the indicated number. That’s good news: the same speed numbers work at every airport and every altitude.

Heat works like altitude. Warm air is thinner than cold air, so a hot day at sea level flies like a higher airport. Pilots call this a high “density altitude”. The engines push less, and you need more real speed to reach the same indicated speed, so the takeoff run gets longer and the climb slower. A high airport on a hot afternoon is the worst case.

Mach is your speed compared with the speed of sound: Mach .85 means 85% of it. Close to the speed of sound, shock waves form on the wing and drag climbs steeply, so jets have a Mach limit as well as a speed limit. The G650 cruises at Mach .85 to .90 and must stay below Mach .925 (overspeed). Way up high, the speed where it would stall and the speed where it hits its Mach limit get closer together, so you handle it gently up there.

When you fly: for takeoff, landing and the stall, go by the speed tape. Up high, watch the Mach number under it. On hot days, check the takeoff run in the planner.

10Wind

The jet flies through the air, and the air itself moves. Wind changes your speed over the ground, not the speed that keeps you flying.

A headwind slows you over the ground and a tailwind speeds you up, but the speed tape, and the lift, stay the same. That’s why you take off and land into the wind: with a 20 kt headwind you’re already doing 20 kt through the air before you move, so the takeoff and the landing need less runway. A tailwind makes both longer.

A crosswind blows from the side and pushes you sideways. In the air you point the nose a little into the wind (“crabbing”), so you still track straight down the runway line. Just before touchdown, straighten the nose with the rudder QE so the wheels roll straight. On the runway, the tail fin catches the wind and swings the nose toward it; keep straight with the rudder.

When you fly: the planner picks the runway that points into the wind. In a crosswind, let the nose point into it on approach and straighten it just before the wheels touch.

11Jet engines

The engines give thrust, but slowly: from idle to full power takes several seconds.

The G650ER has two Rolls-Royce BR725 engines, each pushing with 75 kN (16,900 lbf). Each has a big fan at the front that blows most of the air around the engine rather than through it; that’s where most of the push comes from. N1 is how fast that fan spins, as a percentage of its maximum, and it’s the main gauge for how hard the engines are working.

  • They’re slow to respond. The fan needs seconds to speed up, so add thrust before you need it.
  • They push less up high, where the air is thin. That’s why the climb gets slower near cruise altitude.
  • They push less on very hot days. They give full takeoff power up to about 30 °C at sea level; above that, a little less for every degree. (Pilots call this “flat-rated”.) A cold day gives no extra power, though the thicker air still shortens the run.
  • They never stop pushing. Even at idle a running engine pushes a little, so on the ground the jet creeps forward unless you brake.

When you fly: think a few seconds ahead with the thrust, and keep a foot on the brakes, Space, whenever you’re stopped with the engines running.

12The flight computer (fly-by-wire)

There are no cables between your controls and the wings. A computer moves the control surfaces, and it won’t let you do certain dangerous things.

The G650 was the first Gulfstream built this way, called “fly-by-wire”. In Jet 9000’s default mode (“normal law”) the computer:

  • holds what you set. Let go and the jet keeps its path and bank; you don’t have to keep correcting.
  • won’t let you stall. Pull all the way back and the nose stops at the highest safe angle.
  • limits bank and pitch. It rolls back past 33° when you let go, and never goes past 66° bank, 30° nose up or 15° nose down.
  • slows you near the speed limit by raising the nose.

Pick “Direct law” in the settings to fly without it: no protections, and the jet can stall.

When you fly: make a change, then let go and let the jet hold it. You don’t need to hold the keys down.

Part 3

Flying the G650ER

13What you’re flying

A Gulfstream G650ER: a long-range business jet, 30 m long, with two Rolls-Royce engines. It takes off at about 130 kt (240 km/h), cruises at 41,000 ft at about 490 kt over the ground in still air, and can fly 7,500 NM nonstop.

14Your screen

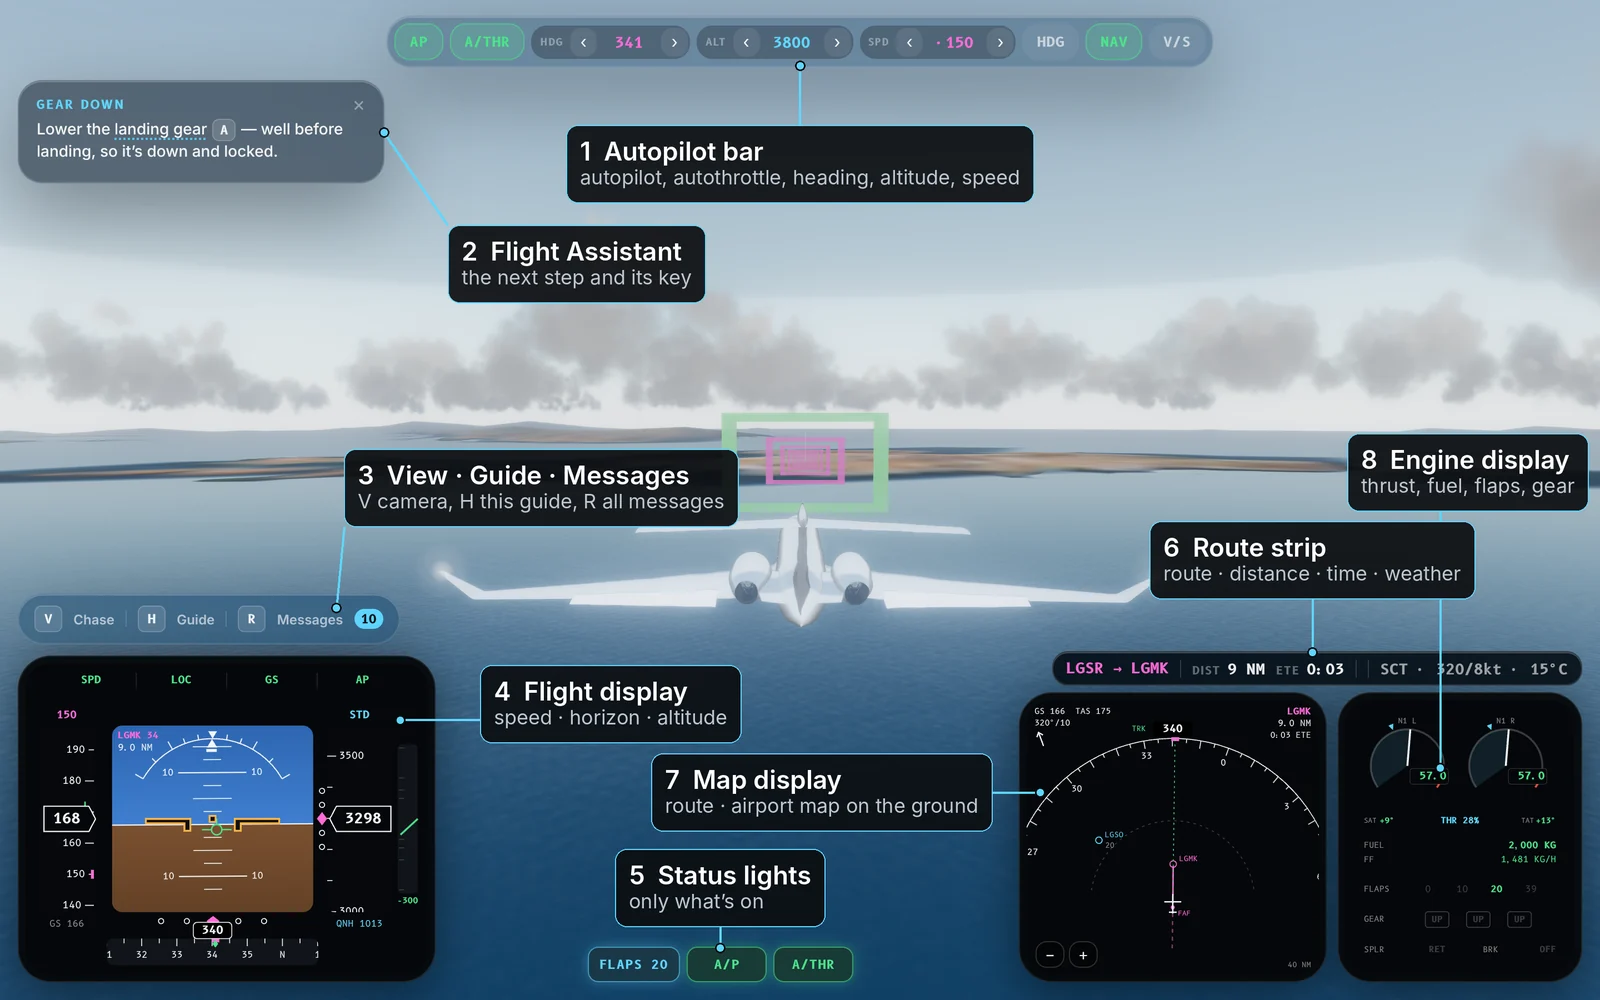
The game screen on approach, with its eight parts numbered
  1. Autopilot bar: autopilot (AP), autothrottle (A/THR), and the heading, altitude and speed it flies. Cyan = you set it, magenta = the computer manages it, green = on. Click any of it.
  2. Flight Assistant: the next step and its key. Close a tip with ×; R shows every message again. It shrinks to its title on the takeoff run and below 1,000 ft, so you can concentrate.
  3. View · Guide · Messages: V changes the camera, H opens this guide, R the message log.
  4. Flight display (PFD): speed, attitude and altitude. Close-up below.
  5. Status lights: appear only when something is on: brakes, parking brake, reverse, speedbrake, flaps, gear, autopilot. No lights, nothing to watch. Next to them is the thrust lever box: the white handle is where your levers are set, the green fill is what the engines are giving right now.
  6. Route strip: from → to, distance and time to go, the weather and the temperature on the ground.
  7. Map display (ND): your route. Close-up below.
  8. Engine display (EICAS): thrust, fuel, flaps, gear. Close-up below.

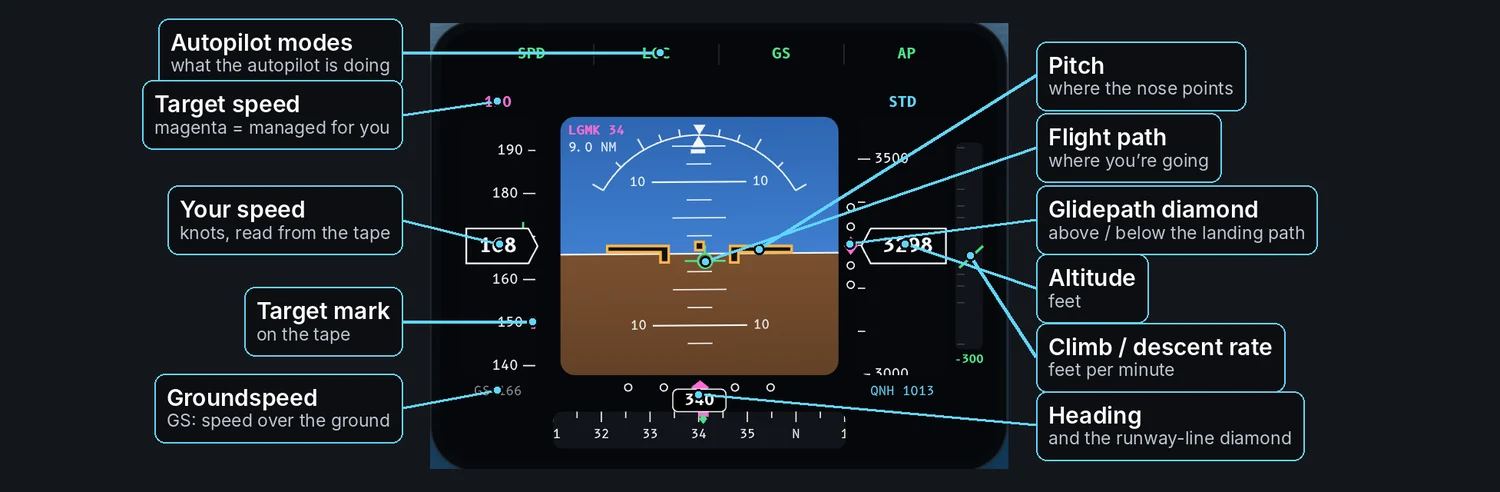
The flight display is where you look most. Speed on the left, the horizon in the middle, altitude on the right:

Close-up of the flight display with its parts labeled
  • Speed: your speed is in the box; the tape scrolls behind it. The magenta number on top and the mark on the tape are your target. A green line from the box (when the speed is changing) shows where it will be in 10 seconds. On takeoff, marks for V1, VR and V2 appear; near a limit, a red-and-black band.
  • Middle: the orange wings are where the nose points (pitch). The green circle is where you’re actually going (flight path). On approach, the pink diamond on the right says if you’re above or below the landing path, and the one at the bottom if you’re left or right of the runway line.
  • Altitude in feet on the right, with how fast you’re climbing or descending beside it.
  • Top row: what the autopilot is doing, in green. Bottom: your heading. On the ground the display also shows your groundspeed (GS) large and white, the speed that matters when taxiing.

The map and engine displays:

Close-up of the map display and the engine display with their parts labeled
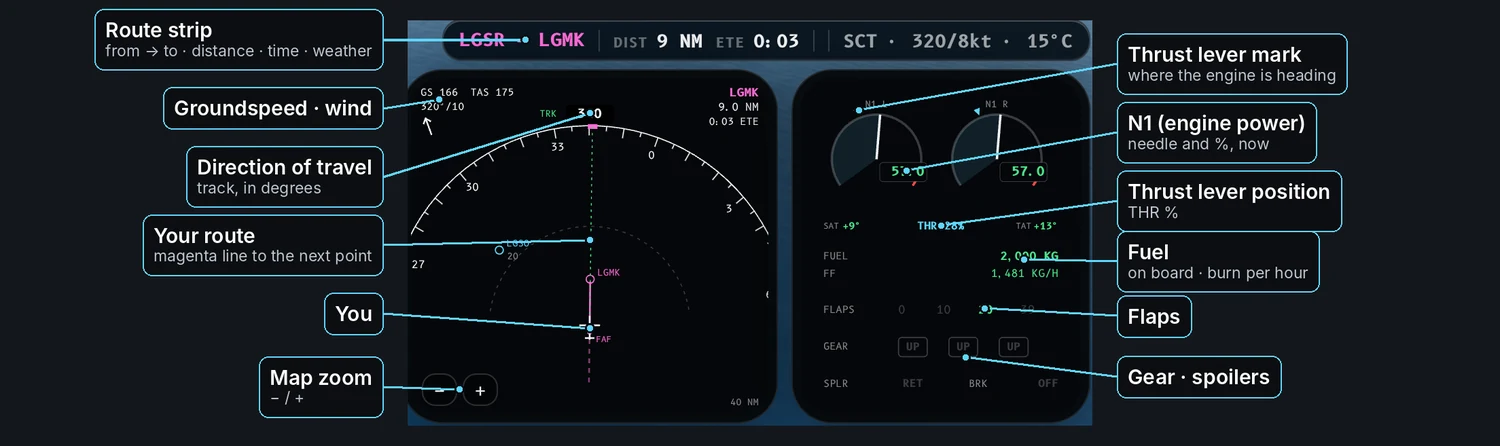
  • Map: you’re the symbol at the bottom; the magenta line is your route, and the number on top is the direction you’re moving. Zoom with − / +. On the ground it becomes an airport map (0.5–2 NM): runways with their numbers, taxiways, and your taxi route.
  • How much thrust you’re using: the thrust lever box shows it at a glance. The engine display shows the same thing three ways, as in the real jet:
    • THR % in the middle is where your thrust levers are: 0% idle, 100% full.
    • The cyan mark on each round gauge is where that lever is sending the engine.
    • The needle and green number are the engine’s power right now (N1). After a change, the needle takes a few seconds to catch up with the mark.
  • Below: outside air temperature, fuel on board and burn per hour, flap position, gear and spoilers.

15Where to start

  • On the runway: engines running, ready to go. The quickest start.
  • At the gate: everything off. You start the engines, get pushed back and taxi.
  • In the hangar: everything off, indoors. A tug tows you out.
  • On approach: 9 NM from the runway with the autopilot flying. Good for practicing landings.

New? Pick the First flight mission: a guided lesson that pauses to explain each step.

16On the ground

Jet engines never stop pushing, so on the ground you control your speed with the brakes, not the engines.

Even at idle, the engines push the jet forward and it slowly speeds up. Real pilots taxi with the thrust at idle and slow down with the wheel brakes, which are the tops of the rudder pedals. Here:

  • Space brakes while you hold it. When you creep past about 15 kt, brake firmly down to 10 kt, then let go. Holding the brakes on the whole time only heats them up.
  • ⇧Space sets or releases the parking brake, which holds the jet still.
  • ↑ a little thrust only to get moving, or to turn when you’re heavy.
  • Q E steer. Keep under 20 kt.

Reverse thrust is only for slowing down after landing. It never backs the jet up: jets can’t reverse on their own. Parked nose-in, a tug pushes you back (K). The ground crew asks you to release the parking brake once the tug is attached, and to set it again when they’re done.

Finding your way: green lights along the taxiway centerline show the way to the runway from the moment you’re parked, and to your stand after landing. The same route is the magenta line on the airport map, and the Assistant calls out the turns. J switches the guides off and on.

17Speeds and limits

Takeoff speeds (marked on the speed tape, worked out for your weight):

  • V1: the decision speed. Below it you can still stop on the runway; past it, you go.
  • VR: rotate: lift the nose.
  • V2: the speed to climb at.

Landing speed: Vref, the reference landing speed, plus 5 kt.

Limits you must not pass:

  • 340 kt, or Mach .925 up high (overspeed)
  • Flaps 10: 250 kt · flaps 20: 220 kt · flaps 39: 180 kt
  • Landing gear down: 250 kt

The red-and-black band on the speed tape always sits at whichever limit applies right now, with an amber band just below it.

You’re warned early. Within 8 kt of a limit, or racing toward one, the speed turns amber, a SPEED HIGH (or FLAP / GEAR SPEED) message appears, the amber master caution light comes on and a voice says “Speed”. Ease the thrust back, raise the nose a little or use the speedbrake B. Past the limit the speed turns red and a clacker sounds. The autothrottle never aims above a limit.

18Takeoff

Before you go: the planner shows how much runway your takeoff needs, for your weight, the temperature and the wind. If it’s close to the runway length, take less fuel or fewer passengers, or pick a longer runway.

  1. Flaps 20 (F twice), strobes and landing lights on, lined up on the centerline. A red “T/O CONFIG” warning means something isn’t set for takeoff, like flaps or the parking brake.
  2. Release the parking brake ⇧Space, hold ↑ to full thrust and keep straight with QE.
  3. At VR, hold S gently until the nose is about 10° up. Not too fast: the tail can hit the runway.
  4. Fly through the magenta frames (gates) that mark a straight climb-out. The next one turns green when you’re on the path, amber when you’re not.
  5. Climbing? Gear up A, then flaps up ⇧F once you’re above 180 kt.

19Climb and cruise

Press three keys:

  • Z autopilot: it steers and holds altitude.
  • X autothrottle: it holds the speed, like cruise control.
  • N NAV: it follows the magenta route.

Set the altitude in the autopilot bar. The jet climbs, cruises, and starts down on its own at the right moment (the “top of descent”). Long trip? Pause P → Skip to approach.

20Approach

A tall green beam marks the runway from 30 NM away. From 14 NM, a tunnel of frames (gates) shows the exact path down to the runway: 3° down, ending 50 ft over the runway’s start. It’s the same path the autopilot follows with the ILS landing guidance.

Slow down and get ready step by step:

  1. Flaps 10 below 215 kt.
  2. Flaps 20 below 195 kt.
  3. Gear down about 9 NM out.
  4. Flaps 39 below 175 kt.
  5. Hold the target speed the Assistant shows.

Keep the next frame green; amber means you’re off the path. The four PAPI lights beside the runway tell you too: two white and two red means you’re on the path.

21Landing

  1. 200 ft above the runway (“minimums”), switch the autopilot off Z. The G650 can’t land itself, and from here it’s yours.
  2. About 30 ft up, thrust to idle ↓ and gently raise the nose S so the wheels touch softly. That’s the flare.
  3. On the ground, hold Space to brake. For extra stopping power hold ⇧↓ for reverse thrust; put it away below 60 kt with ↑. When reverse is on, each engine gauge shows a boxed REV and the REVERSE light comes on.
  4. Off the runway: flaps up, landing lights off, taxi light on, and follow the green lights to your stand.

22Colors and alerts

Every color means the same thing everywhere, as on the real G650’s Honeywell displays:

  • Red: danger, act now. The red MASTER WARNING light flashes.
  • Amber: something needs attention soon. The amber MASTER CAUTION light comes on.
  • Green: on and working normally.
  • Magenta: what the computer is managing for you: the route, managed speeds and altitudes, the gates.
  • Cyan: values you set yourself.
  • White: just information, like PARKING BRAKE.

23When things go wrong

  • Too slow with the nose high (stall): nose down W, full thrust, wings level.
  • Too fast: thrust back, nose up a touch, speedbrake B.
  • Approach going wrong (too fast, too high or off the frames below 1,000 ft): abandon it and try again. That’s a “go-around”: full thrust, nose up to about 12°, gear up once you’re climbing, and come back around.
  • Failures (switched on in the settings): the Assistant walks you through what to do.

Reference

Glossary

Every term the game uses, in plain words. In the game, hover an underlined word for the short version.

Basics

Knots (kt)
Aviation measures speed in knots: one nautical mile per hour, about 1.85 km/h. A G650 takes off at about 130 kt (240 km/h) and cruises around 490 kt.
Feet & flight levels (FL)
Altitude is in feet. Above about 18,000 ft (in Europe it varies) pilots use flight levels: FL370 means 37,000 ft on a standard pressure setting, so every aircraft measures height the same way.
Nautical miles (NM)
One nautical mile is 1,852 m — one minute of latitude. Navigation distances are always in NM.
Heading
The direction the nose points, in degrees: 360 is north, 090 east, 180 south, 270 west. Wind can make your actual path (track) differ from your heading.
Pitch & bank
Pitch is how far the nose points above or below the horizon. Bank is how far the wings are tilted. To turn, a plane banks — normal turns use 15–25°.

Flight controls

Thrust levers (↑ ↓)
The thrust levers set engine power. More thrust to accelerate or climb, less to slow down or descend. Even at idle a running jet engine still pushes: the jet creeps forward unless you brake. Tap ↑ or ↓ for small steps, hold for bigger changes. ↓ stops at idle; reverse has its own key, ⇧↓. The thrust lever box on screen shows where they’re set (white handle) and what the engines give (green fill), which lags a few seconds behind, as on a real jet engine.
N1
N1 is the speed of the engine’s big front fan, in percent of its maximum. Idle is about 24%; takeoff power is close to 100%. It’s the main gauge on the engine display.
Rudder & steering (Q E)
Q and E move the rudder pedals. On the ground they steer the nose wheel; in the air they swing the nose left or right — essential with one engine failed or in a crosswind.
Flaps (F, ⇧F)
Flaps slide out of the back of the wing and curve it, so the wing makes more lift at low speed. You use them for takeoff (flaps 10–20) and landing (flaps 39). They also add drag, and each setting has a maximum speed — retract them as you speed up.
Landing gear (A)
Raise the gear after takeoff once you’re climbing — it creates a lot of drag. Lower it on the approach, well before landing. You can’t raise it with weight on the wheels.
Speedbrake (B)
Panels on top of the wing (spoilers) rise to spoil lift and add drag, so you can slow down or descend faster. After touchdown they deploy fully on their own to press the jet onto the runway.
Brakes & parking brake
Hold Space for the wheel brakes. The parking brake (⇧ Space) holds the jet still while parked — release it before you taxi.
Reverse thrust
After landing, doors behind the engines close to redirect the exhaust forward. On the real jet the reverser levers sit on the thrust levers and only lift when those are at idle; here that’s ⇧↓, held, on the ground. Stow it with ↑ below about 60 kt. Wheel brakes do the rest — and all the slowing while taxiing.

Automation

Autopilot (AP, Z)
The autopilot moves the controls for you. It holds a heading (HDG), follows your route (NAV), holds or changes altitude (ALT, V/S) and can fly the ILS approach down to minimums — then you disconnect it (Z) and land by hand: the G650 has no autoland, and the flight manual wants it off by 60 ft. Moving the controls yourself also disconnects it.
Autothrottle (A/THR, X)
Like cruise control in a car: it moves the thrust levers for you to hold the target speed. With the autopilot steering and the autothrottle handling power, the jet flies itself. Speed MNG means the computer picks the right speed for each phase; ‹ › on the SPD box set your own, and clicking the number switches back to MNG.
NAV (N)
In NAV mode the autopilot steers along your planned route (the magenta line) to the destination, then lines up with the runway. Combined with VNAV it also descends at the right moment.
HDG mode
The autopilot turns to and holds the heading you set with the HDG knob.
V/S
Vertical speed mode: climb or descend at a fixed rate in feet per minute toward the selected altitude.
VNAV & top of descent
The computer works out where to start down (top of descent) so you arrive at the runway at the right height, roughly 3 NM of distance for every 1,000 ft to lose.

Instruments

PFD (primary flight display)
Left tape: airspeed. Middle: the artificial horizon — blue sky, brown ground, the yellow symbol is your aircraft. Right tape: altitude, with the climb/descent rate beside it. The top row shows what the autopilot is doing.
ND (navigation display)
A map that moves with you: your route in magenta, nearby airports, other traffic as diamonds with their height difference in hundreds of feet.
EICAS
Engine fan speed (N1), fuel and fuel flow, flap and gear position. Warnings and cautions appear as crew alerts (CAS) in red and amber.
HUD
The head-up display projects speed, altitude and the flight path onto glass in front of your eyes, so you can watch the runway and your numbers at the same time.
Flight path vector
The small green circle with wings on the flight display shows where the aircraft is actually moving, not where the nose points. The gap between it and the nose is the angle of attack. Put it on the runway threshold and the jet goes there.
Crew alerts (CAS)
Red = warning, act now (stall, pull up, engine fail). Amber = caution, fix it soon. Cyan/white = information.

Takeoff & landing

V1, VR, V2, Vref
V1: the decision speed — after it you continue the takeoff even if an engine fails. VR: rotate (lift the nose). V2: the safe climb speed with one engine out. Vref: the landing speed, about 1.23 × the stall speed with landing flaps. They change with weight.
Rotate
At VR you gently pull the nose up to about 10° and the wing lifts the jet off. Pulling too hard can strike the tail on the runway.
ILS: localizer & glideslope
The localizer guides you left/right onto the runway centerline; the glideslope guides you down a 3° slope. The autopilot can capture both (LOC, GS).
PAPI lights
Four lights beside the runway. Two white and two red: on the glidepath. More white: too high. More red: too low.
Flare
About 30 ft above the runway, bring the thrust to idle and gently raise the nose so the descent slows for a soft touchdown. Under 100 ft per minute is a butter landing.
Crosswind & crab
With wind from the side, the jet points slightly into the wind (crabs) to track straight. Just before touchdown, use the rudder to line the nose up with the runway so the wheels don’t land sideways.

Limits & dangers

Parasite & induced drag
Parasite drag is the cost of pushing through the air: skin friction, the shape of the jet, plus gear, flaps and speedbrake. It grows with the square of speed. Induced drag is the cost of making lift: the slower you fly, the higher the angle of attack and the bigger it gets. Their sum is smallest at one speed (minimum drag); below it, slowing down increases drag (the back side of the drag curve), so speed keeps falling until you add thrust.
Stall
If the nose is too high for your speed, the air can’t follow the wing’s curve and lift collapses. Recover: lower the nose, full thrust, level the wings. Fly-by-wire protection normally prevents it.
Overspeed (Vmo / Mmo)
Above the maximum speed (Vmo 340 kt, or Mach .925) the air loads on the structure grow fast: control surfaces can flutter (vibrate destructively), and near the speed of sound shock waves form on the wing causing buffet and a nose-down pitch. Flaps and gear have much lower limits — they can be damaged. A clacker sounds; reduce thrust and raise the nose gently.
Sink rate / pull up
The ground proximity warning calls SINK RATE or PULL UP when you’re descending toward terrain too quickly. Pull up and add thrust.

Systems

Battery
Switching the battery on powers the displays and lets you start the APU. Once the engines run, their generators take over.
APU
The auxiliary power unit is a small jet engine in the tail. It supplies electricity and the compressed air that spins the main engines to start them. It takes about 15 seconds to come up to speed (AVAIL).
Engine start
APU air spins the engine with a starter. At about 10% N1, fuel and ignition light it, and it accelerates by itself to idle (~24%). Start one engine at a time.
Beacon
The red flashing beacon goes on before engine start and off after shutdown, so ground crew know it’s not safe to approach.
Nav, strobe, taxi & landing lights
Nav lights (red left, green right, white tail) are on whenever powered. Strobes flash white on the runway and in flight. The taxi light lights the taxiway; landing lights are for takeoff and landing.
Pushback & tow (K)
Jets park nose-in at the gate and can’t reverse on their own, so a tug pushes them backward onto the taxiway — steer the tail with Q E and stop when the nose points down the taxiway. Out of a hangar the tug tows you forward instead, because no engine may run indoors. Start the APU and engines once you’re outside.

Weather

METAR
Example: LGSR 35006KT CAVOK 21/16 Q1023 — wind from 350° at 6 kt, visibility and clouds OK, 21 °C with dewpoint 16, pressure 1023 hPa. FEW/SCT/BKN/OVC with a number = cloud cover and base in hundreds of feet.
Air temperature (SAT, TAT)
SAT (static air temperature) is the temperature of the air around you; TAT (total air temperature) is a little higher at speed, because the air heats up as it rams into the probe. Both are on the engine display. Near the ground, a hot day means thin air: longer takeoff runs and slower climbs. At cruise altitude it’s normally around −55 °C.
QNH
The local air pressure, set on the altimeter so it reads height above sea level. STD (1013) is used above the transition altitude.

Your jet is ready

Pick a runway anywhere in Europe and go.

Play now